9.26.2010

Reupholstered Chairs

We were recently given a table and chairs set for our dining room.  It's a really nice set, but very well worn and doesn't match my style so I am attempting to alter it to match our home better.  I found some really pretty fabric at a garage sale and made my first attempt to reupholster a chair!  I was worried I wouldn't be able to do this, but it's actually super easy!!  
  Most seats are attached to the chair by a screw on each corner.  Remove those screws.  The first step is to cut your fabric with about an 1" to 1/2" overhang around the seat of the chair.  Make sure to iron out any wrinkles in the fabric.  
Using a staple gun, staple one edge of the fabric to the back.  Staple about every inch to two inches apart.  

Then pull and staple one of the corners next to the stapled side in either a triangle pattern or by folding on top of the other side you have already stapled down.  
Staple the second edge, keeping the front free of wrinkles and continue steps until you come back around, pulling and keeping fabric tight.  
Reattach screws and you're done!


9.09.2010

Mom's Group Card Project

For a mom's group craft project, I decided to make a couple of fairly easy cards so the moms can either use them or package them together as a gift.  
I got the sketch ideas from a blogger who makes clean and simple cards (but also super cute)!  
I cut all of the pieces for about 20 cards of each type.  I then put the little pieces to each card in sandwich bags and put all the rest of the pieces in a large freezer sized bag so it's all organized and ready to distribute.
I love how simple these cards were to make, but they are really cute too.

9.01.2010

Planes, Trains, & Automobiles Birthday Party

For my son, Elijah's, first birthday party, we had a planes, trains and automobiles theme.  The invitation looked like a ticket and all of the info like ticket number was the birthday boy's birth date.  The row, section, and seat number was "CHUG" "CHOO" "CHOO".  Then I made paper airplanes and tucked the blue ticket into the yellow paper airplanes.  Yellow and blue were the colors.

Some decorating things I did were: hanging paper airplanes from lights with a little patch of fiberfill clouds at the top, a black paper construction road with toy cars, homemade signs of planes trains and autos, signs around the house that look like real street signs, I collected toys that the kids already had that had a transportation theme and decorated tables with those, I put candy rocks in some truck beds, some runts in a farmer tractor, some milk duds in a dump truck, at the present drop of there was a sign that said "Cargo", at the goodie bags table there was a sign that said "Baggage Claim", a train that the kids could ride on, we had a sign that looked like a Driver's License where the kids could stick their head through and get their picture taken which I then had printed and mailed with the thank you cards which were a really cute picture of Elijah in a conductor's outfit.

For games we had an airplane throwing contest.  Prizes went to kids who had longest throw, shortest throw, throw closest to a particular target, ...  I was also going to play a game of musical chairs, but make it be musical bus and make the chairs look like a school bus and play "Wheels on the Bus Go Round and Round..."  but it was too busy to play that game.  We also did a train pinata.  

In the goodie bags I had pull back cars, rubber duckies that were driving a car, a train or flying a plane, an airplane, a RXR package of roll up gum, coloring pages with a transportation theme,

See the cake I made here.

Planes, Trains, & Automobiles Cake

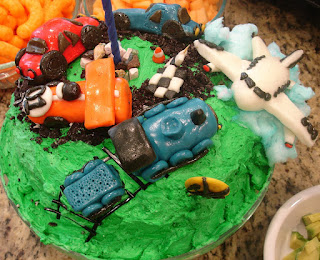
Here is my finished Planes, Trains and Automobiles cake!  
I did a "road" out of crushed Oreo cookies for the automobiles, a little cone and racing flag on the road, and there was candy that looked like rocks (from the candy store) in the center of the road circle, holding the candle up. 
I added a train track made out of black licorice for the train to ride on, along with a "R X R" sign.  
For the airplane I pinned him in with some toothpicks and covered those up with cotton candy that looked like clouds.  
The frosting underneath it all was very sweet and sugary, not your typical butter cream frosting.  I am still looking for the perfect birthday cake frosting, but this would be really good for a fancy occasion--like a wedding cake.  It also comes out extremely white (although I dyed it green to look like grass).  Click here for the recipe.  I also have some more pictures of my fondant images here and the recipe for the marshmallow fondant (what the images are made from) here.

White Wedding Cake Frosting

Ingredients

  • 2 cups shortening
  • 8 cups confectioners' sugar
  • 1/2 teaspoon salt
  • 2 teaspoons clear imitation vanilla extract
  • 6 fluid ounces heavy cream

Directions

  1. Cream shortening until fluffy. Add confectioner's sugar and continue creaming until well blended.
  2. Add salt, vanilla, and whipping cream blend on low speed until moistened. Add additional whipping cream if necessary (up to 2 ounces). Beat at high speed until frosting is fluffy.

LinkWithin

Related Posts with Thumbnails