7.26.2011

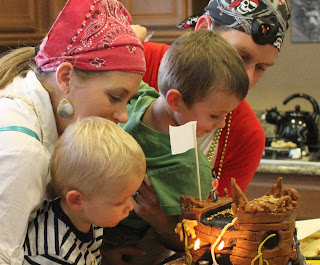
Pirate Ship Birthday Cake

Idea came from Enchanted Cakes for Children by Debbie Brown.  Used MM Fondant, Debbie's recipe (in book) for the spongecake, and a chocolate butter-cream frosting from allrecipes.com.  The gold treasure, seaweed, fish, rocks, gold treasure scattered on the ship, ship planks and decorative ship parts, rope, barrels, and anchor are all MM fondant.  The flag I made on the computer, the "sand" is a mix of brown sugar, graham crackers, and gold sprinkles.  Also, the X marks the spot is a fruit roll up and the pirate is a figure from our party store.
 We had a combo party for a three and two year old.  The candles were the "cannons" (three candles on one side and two on the other for both boys to blow out).
 The shipwreck (after it was served...):

7.10.2011

Pirate Party Invite

It's birthday season around our house!  We decided to do combo birthday party for our two older boys and the theme this year--PIRATES!  It has been so fun coming up with stuff for the party!
Here is the invitation:
I burned the edge of the wording which reads in a "pirate font": 
"Ahoy me hearties!  Come if ye dare to Pirate Nehemiah and Pirate Elijah's Birthday Bash! We need shipmates to swab the deck, walk the plank & hunt fer pirate treasure.  Aaarr!  Join us for some grub, fun, kiddie spirits & pirate treats.  Ship sets sail, so chart yer course for Saturday, July 23rd in the year of me Lord two thousand and eleven.  We be meetin from 11:00 to 2:00.  Meet us at old man (our last name) Island (our address).  Yo ho ho let us know, wave yer flag if ye be attendin' or have yer mum send word by mail or by phone to deck hand Melissa at XXX-XXX-XXXX or (my email address).  Sees ye there if ye dare.  Aarrgghh!  (Pirate Garb and gifts optional)" The return address said "(our last name) Island" and our address.   Each person was addressed as a buccaneer (ex: "Mark, Amber and de wee buccaneers" and their address)
 

4.10.2011

Crafting on Hold for a Few Months!!!!

So I haven't been very busy crafting/gardening/cooking lately and really haven't had the time to blog about anything I have been doing because: WE HAVE A NEW ADDITION TO OUR FAM!!  Yea!!!  For you avid followers, I hope to be back at my craft table in a month or two so don't fret!  Here's a picture of the newest little man:

2.01.2011

Make-Up Roll

 I made this make-up roll as gifts for some family and friends.  Hope you like!
 You can put lipstick or eyeliner or mascara in the holes, then stick it in your purse so your make-up stays nice and you can find it easier!
 I got most of these fabrics as discounted remnants so it ended up being relatively inexpensive to make!
 Here they all are:

I originally found this idea from kellyrachel.com/blog and here is her tutorial that I followed:

  • your 5″ x 5″ squares
  • lining fabric 2
  • light fusible interfacing
  • ribbon

{Click on any image to see a larger version.}

Choose 6 of your 5″ x 5″ squares.

Cut 1.5″ off 2 of the squares.

Cut these rectangles in half along the width, so that you have 4 rectangles measuring 2.5″ x 3.5″.

Cut your other 4 squares in half.

Make 2 blocks with your longer rectangles by sewing 4 rectangles together, long edges together. You will end up with 2 blocks of 4 rectangles each. Press seams in one direction.

Make another block out of the smaller rectangles by sewing the long edges together. Press seams in one direction.

Iron the light fusible interfacing to the wrong side of one of the larger blocks and also to the smaller block.

Cut a rectangle from lining fabric 2 measuring 8.5″ x 3.5″. This is the lining for the pockets in the roll.

Now we’re going to make the pocket piece. Sew the smaller block to the lining piece right sides together, along the top edge only. Turn the fabrics out the right way and press the seam.

Place the larger block without the interfacing attached right side up on the table. Place the pocket piece on top, pieced side up and bottom raw edges aligned. Pin in place.

Sew up the 3 seam dividing lines on the pocket piece. This will make 4 narrow pockets.

Cut 25″ from your ribbon.

Lay the fabric piece down on the table, pocket side up. Fold the ribbon in half {right sides together if it has a right side}. Place the folded edge at the left of the fabric piece, in the centre. Let it overhang by about 1/4″.

Place your other pieced rectangle on top, right side down. Make sure the tails of your ribbon are tucked in and won’t be sewn into the seams. Pin in place, with one pin placed in the ribbon to keep it in place.

Sew around the sides, leaving a gap at the top about 2″ long for turning. Clip the corners.

Turn your roll out the right way, push out the corners. Press the roll, with the seam allowances of the gap you left turned in. Pin along this gap.

Topstitch around the top of the roll, around the top part only, about 1/8″ from the edge. {Don’t sew on the pocket.} When you topstitch around this rectangle, you will also be sewing your gap closed.

Prevent the edges of the ribbon from fraying by turning the ends over and stitching them down, or by applying a product like Fray Stop.

Finished! Now you can add your makeup to your roll. Close your roll by rolling it up and tying the ribbon around it to keep it closed.
Mini Makeup Roll Closed

1.20.2011

Christmas Cards

A little late in sharing, but here's how my Christmas cards ended up! :)

12.31.2010

Art Display

Another handmade project I did with our church's mom's group is make these art displays.  We each decorated one or two clothespins with ribbon, letters, permanent markers, and so on... and then clipped them to a piece of string.  They were then given to some missionary families who have young girls who like to color for them to hang and clip their artwork from!  (The letters are the beginning of the girls' names.)

12.23.2010

Omelette Attempt!

Here's a look at my first omelette making attempt!  Some options inside were: green onion, ham, tomato, green bell peppers, red bell peppers, avocado, cheese, and bacon.  Here's a great video to watch to make you feel like you know a little bit about what you are doing: http://www.youtube.com/watch?v=SUqlLoOaAds&feature=related  I used butter in my pan instead of olive oil and I also folded the egg/added the inside ingredients on the plate rather than in the pan.  We had so much stuff inside that it was too hard to fold in the pan... Also, I recommend for the egg mixture doing two eggs and salt/pepper and possibly a little splash of milk depending on how runny you like it (more milk, more milky runny flavor).

12.14.2010

Another Floor Cushion

Here's another attempt at a floor cushion!  To see the other ones I made click here and to to see my tutorial click here.

11.19.2010

Flower Hair Clip

As a project for a mom's group I am involved in we made some really cute hair clips for girls.  These are a great gift or fun to keep!  We made one for ourselves and then we made several for an organization called Birth Choice.  They provide alternative options to abortion and provide support to moms during pregnancy and after baby comes.  We hope these fun gifts encourage some of those moms.  Here's a picture tutorial of what we did:
 Gather materials and cut out flower templates (search Google images or click here):
 Cut different fabrics for three sizes of flower (shown: jean and felt):
 Tie ribbon through button holes:
Using a hot glue gun, glue the three sizes of flowers on top of each other and then glue the button on top of the flowers:

For the clip on the back, to make it a little cuter and for more support, add a small piece of ribbon:
 Wrap it around the clip, and hot glue it shut:
Then glue the clip onto the back of your flower at the ribbon and the two ends:
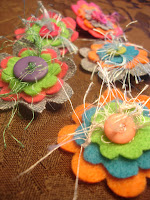
  Here's a few more samples:

LinkWithin

Related Posts with Thumbnails